Building a CRUD application with SvelteKit and SQLite
Learn how to create a fully functional CRUD application with SvelteKit, TypeScript, Drizzle ORM and SQLite.

When I started learning Laravel a few (actually, many) years ago, CRUD applications were the de facto standard for learning the framework. In one tutorial, you'd cover the basics of Laravel, models, views, controllers, and databases. And at the end of the tutorial, you'd have a fully functional CRUD application, and a good understanding of how it works.
For quite some time now, I've had the impression that this is something (this kind of full stack, end to end tutorials) that is missing a bit in the Svelte / SvelteKit ecosystem.
This blog post is my attempt to fill that gap. I'll be using SvelteKit to build a simple CRUD application, and I'll be using SQLite as the database.
What are we going to build?
No, we are not going to build a to-do list. Instead, we will build a simple personal bookshelf application. Users will be able to manage their books. Here are a few features that our application will have:
-
Users can have an index of their books
-
Users can add new books to their index
-
Users can edit books in their index
-
Users can delete books
-
Users can search for books
Now that we have an idea of what we're going to build, let's get started with what is SvelteKit.
What is SvelteKit?
Before talking about SvelteKit, it makes sense to briefly explain what Svelte is.
Svelte is a component framework for building interactive and reactive web applications. Unlike other frameworks like React , Svelte doesn't use a virtual DOM. Instead, it comes with a compiler that transforms your declarative Svelte (the language) code into highly performant and optimized JavaScript code.
For a quick grasp, here is how you'd write a simple counter component in Svelte and in React:
Svelte:
code loading...
React:
code loading...
As you can see, we could argue that the Svelte code is more concise and easier to read.
Now, SvelteKit. You can consider SvelteKit to be a “meta” framework on top of Svelte. It provides a set of tools and functionalities for building full-stack web applications . You get things like routing, data loading and streaming, API routes, middleware ( hooks ), and more.
Why SQLite?
For very long, I've always considered SQLite as a small database for hobby projects or for tutorials. It's easy to use, very portable, lightweight. And it's free. But in the last few years, there have been many services that leverage SQLite, and give it production-ready features.
You could use Litestream for backup and replication, or Turso for scaling SQLite.
So, I'm going with SQLite for this tutorial because it's a great database, and it's now scalable and production-ready.
Setting up the SvelteKit project
Let's start by creating a new SvelteKit project (with TypeScript).
code loading...
Once that's done, we also need to install some dependencies to handle database interactions.
code loading...
I'm using Drizzle ORM to interact with the database. Drizzle allows you to create a database schema (written in TypeScript), and gives you a set of tools to interact with it. There is also Drizzle Kit , a CLI tool to generate migrations files and push them to the database.
Together, the combination of Drizzle ORM and Drizzle Kit is a great way to manage your database schema and migrations.
In addition, we are also using Oslo , which is an auth utilities library (by the author of Lucia Auth ). We will use it to generate random IDs that will be used as default values in the database and other parts of the application.
Finally, there is Better SQLite 3 , a Node.js SQLite driver that is one of the options that Drizzle ORM uses under the hood for SQLite support.
Setting up the database
Let's go ahead and create a few files to set up the database.
code loading...
code loading...
code loading...
The client.ts file is where we will create the database connection. drizzle.config.ts is the configuration file for Drizzle ORM. It specifies the database driver, the database credentials, and the location of the migrations files.
The migrate.ts file is the migrations script.
Let's also update the package.json file with a few commands to help us with the database. In the scripts section, add the following commands:
code loading...
Now, we can run the generate-migrations:db command to generate the migrations files.
Make sure to add SQLITE_DB_PATH to your .env file, and also ignore the data.sqlite file in the. gitignore file.
Creating the database schema
We'll keep a basic structure for the books table in the database. It will have the following columns:
-
id— a unique identifier for the book -
title— the title of the book -
author— the author of the book -
isbn— the ISBN of the book -
publicationDate— the book publication data -
created_at— the date and time the book was created -
updated_at— the date and time the book was last updated
Let's create the schema file.
code loading...
Go to https://orm.drizzle.team/docs/column-types/sqlite to see the full list of SQLite column types supported by Drizzle ORM.
During development, I like using pnpm push:db to (quickly push schema changes to the database)[ https://orm.drizzle.team/kit-docs/overview#prototyping-with-db-push ].
A production-ready approach would be to first generate the migrations files with pnpm generate-migrations:db , and then push them to the database with pnpm migrate:db .
Seeding the database
I like having a seed file that will populate the database with some initial data. This is useful because it gives you a starting point for your application.
I'm going to use Falso to generate random data for the books.
code loading...
Now, let's create a seed.ts file in the src/lib/server/db directory.
Let's create a seed.ts file in the src/lib/server/db directory.
code loading...
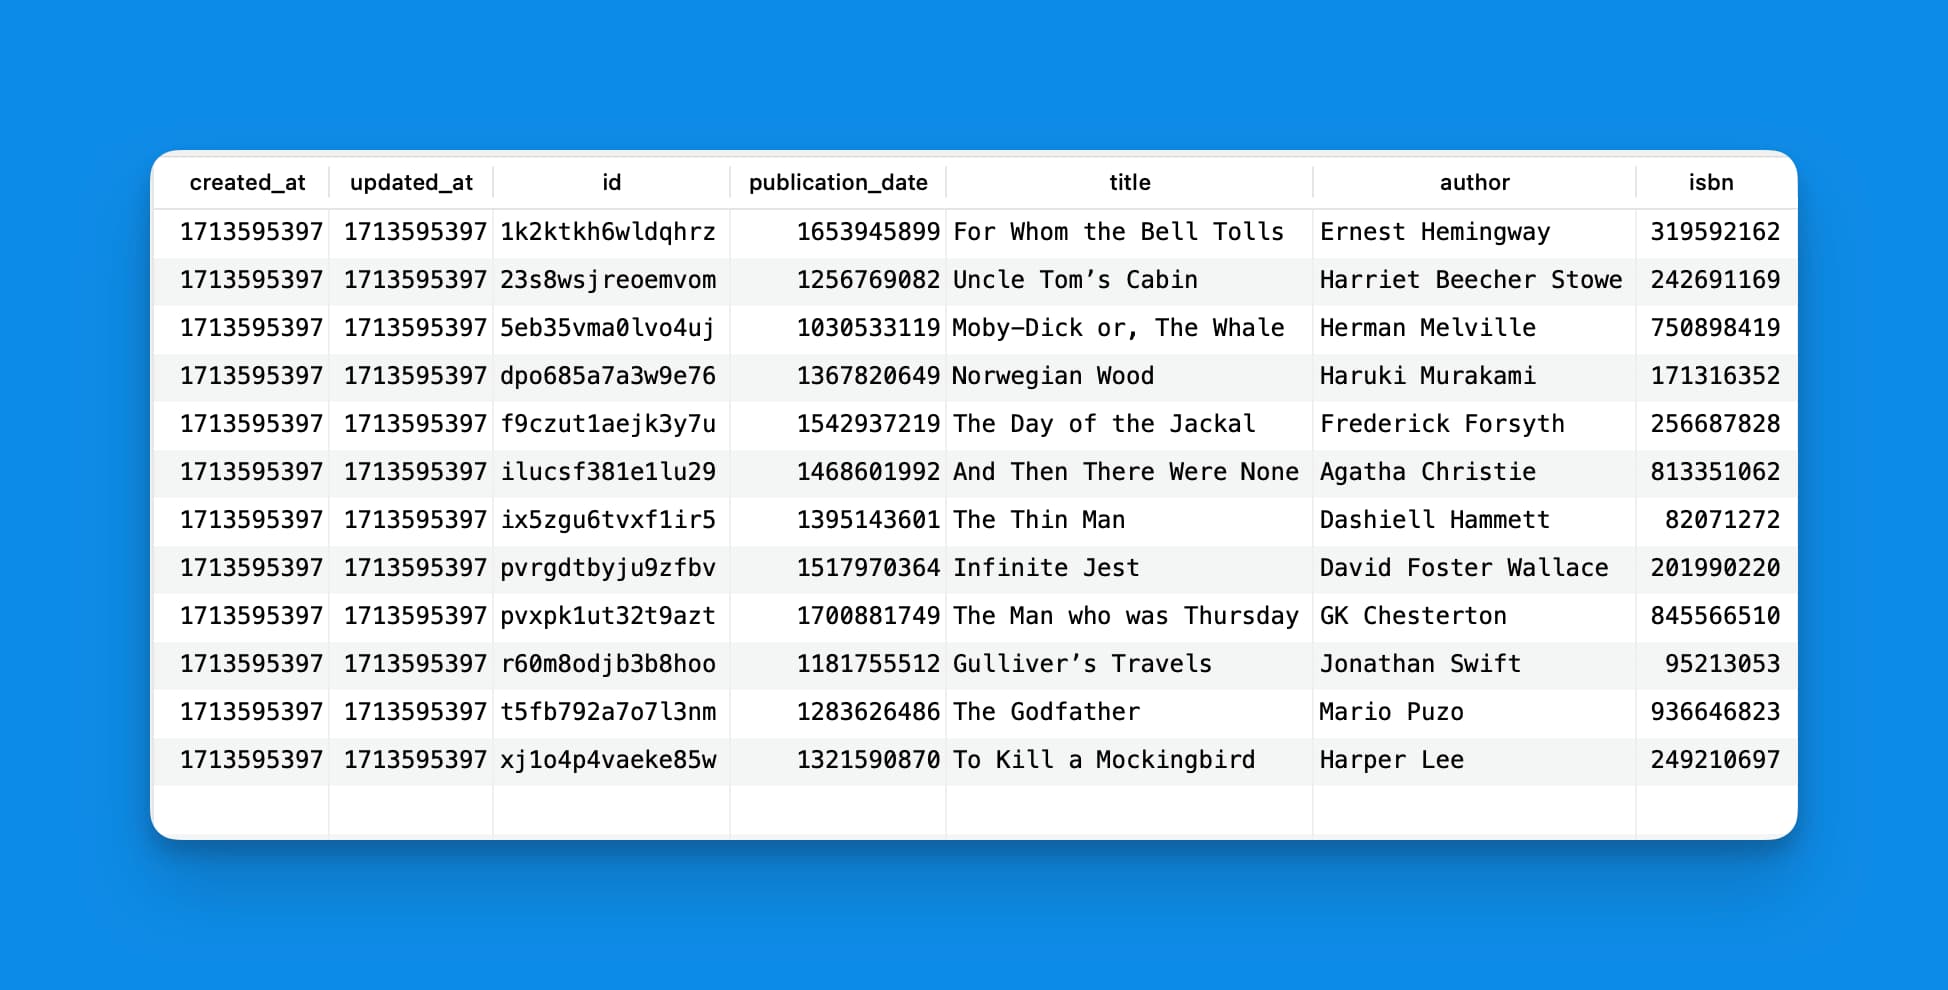
What's happening here is simple. We're generating twelve random books using Falso, and then inserting them into the database.
We can now run tsx src/lib/server/db/seed.ts to seed the database with some initial data. Make sure to install tsx globally in your system if you haven't already.
Here's what the database looks like with the seed data:

Helpers functions for CRUD operations
In the previous section, we've used db.insert(books).values(book) to insert a book into the database. This is one of the conveniences that Drizzle ORM provides. Type safe and easy to use. Let's go ahead and create some helper functions to make our life easier.
code loading...
This is mostly all we need for our CRUD operations. You can see that we are using the inferred types from Drizzle exported in the schema file.
CRUD pages
Adding a new book
What we want is a form for adding a new book, display eventual errors if they occur, and redirect the user to the new book page once the book is added.
Let's start with the form.
code loading...
Our form has the book title, author, ISBN, and publication date as required fields. Because we want SvelteKit to takes care of the form submission and progressive enhancement, we're using the enhance function from the $app/forms module.
We are also using a named action which tells SvelteKit where the form submission logic should be handled. Let's go ahead and create a new file called +page.server.ts in the src/routes/books/add directory.
code loading...
This is almost all we need to handle the form submission. We are using the createNewBook helper from the $lib/server/db/books file to create the new book in the database. Since we are handling any error in particular in the helper function, we use the try…catch block to catch any error and return a 500 error code with a message.
Back to the form. The Notice component is a simple component with two props: message and type . It displays a notice with a message and a different background color based on the type.
If an error is returned by the server after the form submission, we'll display the error message in the Notice component. Else, we redirect the user to the new book page. We can do this because we've returned the bookId from the server in the response in case of success.
It's also possible to handle redirects in the form action. But redirects on the server will only work outside a try…catch block. And because we need that block, we have to do a client-side redirect.
Books index page
For the books index page, we need to get all available books from the database and display them in a list or table.
First, we send the books with the getAllBooks helper from the $lib/server/db/books file in the load function.
code loading...
In the component, we create a simple table with the books.
code loading...
That's it!
Single book page, editing and deleting books
The single book page will also serve as a place where users can edit and delete books. The URL structure for that page will be /books/[bookId] .
Because the book ID is dynamic, we'll use a dynamic route. In SvelteKit, you do that by creating a folder with this format: src/routes/books/[parameterName] . In our case, the parameter name is bookId .
Let's create the load function for the single book page.
code loading...
The getBookCoverId() function uses the ISBN of the book to get the book cover from the Open Library API.
Moreover, instead of returning that cover ID directly, we're instead returning a promise. This is because fetching the API could take a while, and we don't want that to block the UI from rendering.
So, as soon as the single book route is loaded, we'll return the book data (this should be pretty fast, we're getting it from our SQLite database). Our page will be rendered when the book data is available, and later on, when the cover ID is resolved, we'll display the cover image. This concept is called streaming in SvelteKit.
Let's look at how it's done.
code loading...
We use the Svelte await block to wait for the cover ID promise to resolve, and then display the cover image or a message if the cover ID is not available.
Let's move now to editing and deleting books.
Editing books
For the book edition, we want to display a form when the user clicks on an edit button. For UX considerations, we'll use a dialog box for that form, instead of displaying it in the same page.
code loading...
That form looks a lot like the one we used to create new books.
Here's the logic for the updateBook action.
code loading...
This is just about all we need to handle the form submission. We use the editBookById helper from the $lib/server/db/books file to update the book in the database.
Deleting books
For the book deletion, we just need to know the book ID, and then use the deleteBookById helper to handle the deletion.
code loading...
Wrapping up
That's it! We've built a simple CRUD application with SvelteKit and SQLite. This article covers a lot of ground, but there are still plenty of things to learn and explore. Topics like proper error handling, UX, security, and performance are all important to consider when building a real-world application.
I hope you enjoyed this tutorial and learned something new.
If you have any questions or comments, feel free to reach out to me on 𝕏 ( @iamsegbedji) or by email ( [email protected] ).